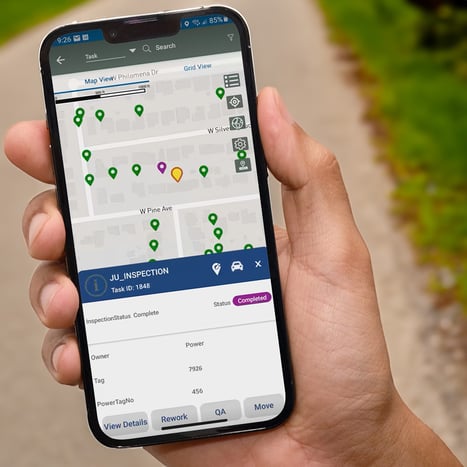
Capture, Share, Act: Task Agent App Moves You in the Right Direction

The increased demand for fiber rollout keeps driving competition in the utility space, underscoring the need for the utmost efficiency. Alden's Task Agent app helps you align and coordinate effectively with all stakeholders, protect the integrity of your asset data, and collect precise attributes swiftly in the field to meet regulatory timelines and keep work moving. Every hour is money, and every day ushers in multiple decisions to be made. But you cannot forfeit quality control for speed. That’s where tech comes in. Alden Systems developed the Task Agent app, which automatically syncs to Alden ONE, with efficiency and accuracy in mind. The app offers field data capture using your iPhone or Android device. Anyone can quickly capture utility pole data, including class/height, midspan height, attachment ownership, and more.
Dive deeper and you’ll see that Task Agent’s value extends beyond accomplishing field audits. With the capability to be configured to collect company-specific data fields, this tool can scale as needed with your company. Best of all, built-in features ensure data integrity.
Working Smarter, Not Harder with Task Agent
Navigating with Precision
Notably, one feature stands out: the map view. Admins can direct individual field personnel to exact locations with associated assets using pre-loaded interactive maps. The map feature in Task Agent is a powerful tool, particularly for field technicians who need to pinpoint exact locations of utility poles. This app boasts features like a GPS-driven running man icon that tracks your location in real-time, the ability to layer on useful information such as zip codes, and form field customization options.
Data Field Flexibility
Users can tailor data fields to their specific business requirements. This flexibility ensures that any utility or contractor, no matter their size or specialization, can efficiently collect the right data. The app enforces accuracy by restricting input formats to ensure consistency. It's important to note that certain features are hardwired to prevent errors. For instance, the check-in and check-out process ensures that no two individuals can work on the same task simultaneously, eliminating the risk of duplicate efforts.
Reduce Errors in the Field
Task Agent simplifies data entry, reducing the risk of human error. For instance, the barcode reader feature quickly scans asset barcodes, preventing data entry mishaps, saving valuable time. With the app, your staff can seamlessly perform QA checks of field work, cross-referencing data with photos and notes, all from the convenience of their desks. Admins have complete control over who has the authority to open and complete tasks, ensuring that only qualified personnel handle QA, while granting techs the ability to rework tasks if necessary.
Save Time
The copy function allows quick replication of frequently used data entries, drastically reducing input time. Whether it's duplicating equipment information or violations, the copy feature is a time-saving gem.
Capture Essential Documentation
Task Agent streamlines the identification of violations, allowing techs to quickly identify and document issues. Visual indicators provide a heads-up for potential problems, allowing for timely intervention. The app also leverages the power of the camera to capture visual data, serving as a valuable record of the conditions at time of inspection, aiding in QA, and dispute resolution.
Responsiveness
Once a task is completed, it is uploaded within as little as 60 seconds, and the data becomes accessible through the Task Agent app. This real-time functionality is invaluable for businesses that require fast data refresh for compliance audits or immediate response to field issues.
Anywhere Anytime Functionality
Use Task Agent online or offline. Field work often takes place in areas with limited or no cell service, making online applications impractical. Task Agent excels in offline mode, efficiently downloading all necessary data, including photos and map backgrounds, for speedy, reliable performance in the field. This capability is particularly essential in rural areas and locations with unreliable network coverage.
Take It a Step Further – Share Field Data with Ease
Data is only useful when it can be shared appropriately - internally or externally. Task Agent helps you share data with the right partners to facilitate work coordination.
- Share data, images, and tasks with any stakeholder needing access using the integrated Alden ONE platform - divide steps of capture, analysis, and verification among internal and external resources. Example: For companies managing pole transfers, Task Agent simplifies the process by allowing field techs to create tasks, input data, and automate notifications.This eliminates the need for manual paperwork passing and speeds up the entire process, benefiting both the company and its partners.
- Retain data for future use by engineering, construction, and executive management. Example: Task Agent empowers approved users with the ability to crowdsource data. The app can be easily downloaded from iOS and Android App Stores, enabling designated users within the company to report actionable issues and analyze patterns. This ensures that no critical information is lost in translation and that problems can be addressed promptly.
Turn Your Data into Action.
Having access to real-time data is crucial for making informed decisions and getting work done. Imagine having the ability to gather and analyze essential field asset data within minutes, enabling you to respond swiftly to critical situations. When data is easily accessible and digestible, it can be transformed into business intelligence. That’s just one more advantage of Task Agent. To find out more, book a 1:1 meeting today!
ABOUT TASK AGENT
Alden System's Task Agent runs on Apple iOS and Android, is available in these app stores, and can be used online or offline. Information flows back into the Alden ONE platform to manage assets and activities while connecting engineering, construction, and executive management.
